 Besides conversion from any source format to just about any output format, WebGopher has been specifically designed to add proprietary automation specific headers and data chunks, so your automation system will accept and play the result without the need to pay someone to manually run the downloaded files through your automation manufacturer’s programs before they can be played on air. Simply configure an Event with the time, place, and output details and WebGopher will make sure the program is always in your system, ready to play. |
||||||||||||||||||||||||||||||||||||||||||||||||||||||||||||||||||||||||||||||||||||||||||||||||||||||||||||||||||||||||||||||||
Space Considerations The disk drive on which WebGopher is installed will need to have sufficient free space for all of the Events – video or audio programs – that you will be downloading daily. As a rule of thumb choose a location that has about twenty times the size of the file in compressed form at the source location in free space on the install drive. For example, an MP3 audio file of 50MB converted to a 44.1Khz stereo WAV file of 250MB when completed. During the conversion process there may be as many as four versions of the file open before being deleted and the final version stored elsewhere on your network. So if WebGopher is set to download and convert up to five items concurrently with an average size of 50MB, your install location will need at least 6.25GB of free space for it to work with. Network Access Of course it goes without saying that WebGopher requires an active internet connection. Without it your license will not verify and you won't be able to grab all those wonderful programs for your listeners. In addition, the computer on which WebGopher is installed must have a shared network connection to your automation so the converted audio can be placed for air. |
||||||||||||||||||||||||||||||||||||||||||||||||||||||||||||||||||||||||||||||||||||||||||||||||||||||||||||||||||||||||||||||||
Downloading & Installing WebGopher does not place any hooks or hidden entries in the Windows registry, so just deleting the prgram's folder, deletes it from your system. We have included an uninstall program in the main WebGopher folder to make the task easier. |
||||||||||||||||||||||||||||||||||||||||||||||||||||||||||||||||||||||||||||||||||||||||||||||||||||||||||||||||||||||||||||||||
 Scheduler variables.
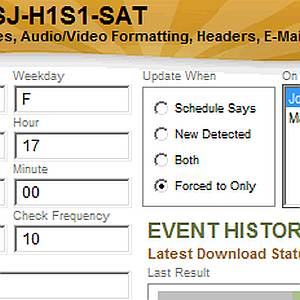
To set a recurring time for the Event you may specify the day of the week, hour of the day, and minute of the hour. You may then choose to have the Event processed at the times you have entered (enabled) or ignore the time entries and process the Event only when forced manually (disabled). In addition WebGopher provides a special mode that checks for a new version of the source file, and processes the Event if found. You can set WebGopher to process the Event only if an update is available, or both at the time scheduled and when an update is found.The `Check Frequency` field tells WebGopher how frequently to test for an update for this Event's source file, in minutes. The Weekday field accepts `M`, `T`, `W`, `R`, `F`, `S`, and `U` to represent the days of the week (Monday through Sunday). Enter each day you wish the Event to be processed, separated by a space or dash. You can use an aasterisk, `*` to represent every day. The Hour field indicates the hours of the specified days to process the Event. These are two digit numbers in 24-hour time, from `00` to `23` to represent the 12AM hour to 11PM. Separate entries with a space or dash. Use an asterisk to represent every hour. The Minute field shows which minutes of the specified hours to process the Event. Once again enter two digit numbers from `00` to `59` separated by a space or dash for each minute you wish the Event to be processed. |
||||||||||||||||||||||||||||||||||||||||||||||||||||||||||||||||||||||||||||||||||||||||||||||||||||||||||||||||||||||||||||||||
|
||||||||||||||||||||||||||||||||||||||||||||||||||||||||||||||||||||||||||||||||||||||||||||||||||||||||||||||||||||||||||||||||
|
||||||||||||||||||||||||||||||||||||||||||||||||||||||||||||||||||||||||||||||||||||||||||||||||||||||||||||||||||||||||||||||||
|
||||||||||||||||||||||||||||||||||||||||||||||||||||||||||||||||||||||||||||||||||||||||||||||||||||||||||||||||||||||||||||||||
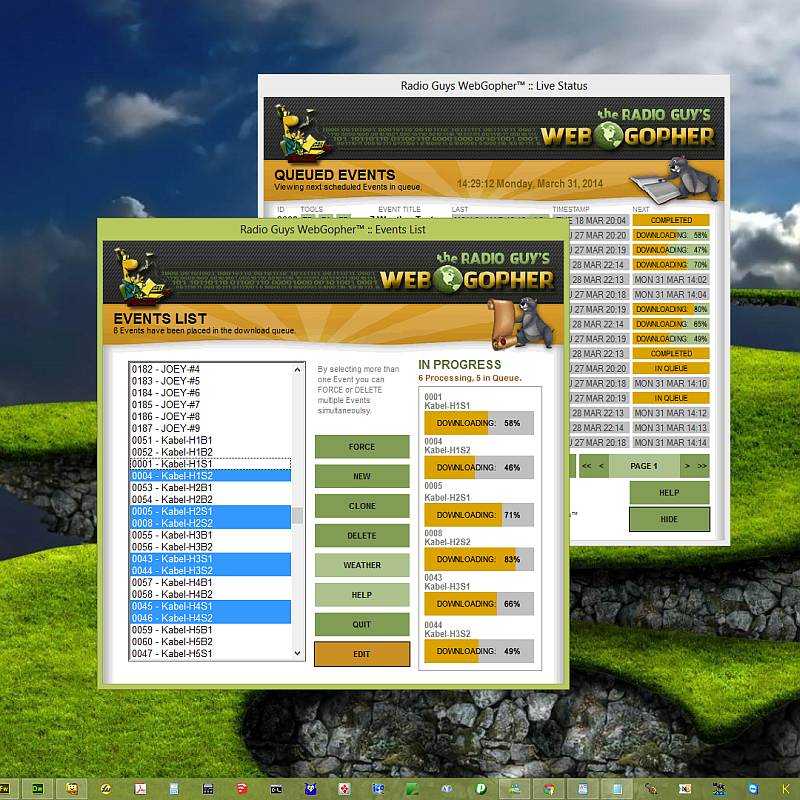
 Light circles indicate clickable controls. Click for video tutorial.
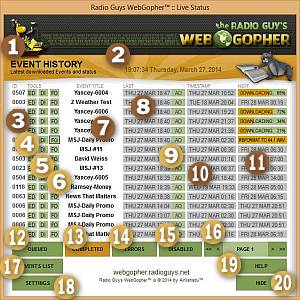
(1) Ttitle shows which Events are being displayed (2) Current Time & Date (3) Event IDs (4) Launch Event Editor for this Event(5) Disable or Enable the Event (6) Force the Event into queue for immediate processing (7) Event Title (8) Time & date Event was last processed (9) Result of last Event processing, AO is sucessful or ER if an error occurred, clickable to view details (10) Actual timestamp of the source file that was retrieved (11) Time & date the Event is next schedule to be processed, or a live status bar if in progress now (12) Queued displays next Events to be processed in time ascending order (13) Completed displays the last Events processed in time descending order (14) Errors displays Events that did not complete successfully, latest first (15) Displays Events that are disabled (16) Page navigation controls to show the next or last 16 Events (17) Opens the Events List menu (18) Opens the General Settings menu (19) Opens a browser to this page (20) Hides the menu, to display again left click the WebGopher™ icon in the Windows System Tray. |
||||||||||||||||||||||||||||||||||||||||||||||||||||||||||||||||||||||||||||||||||||||||||||||||||||||||||||||||||||||||||||||||
 Light circles indicate clickable controls. Click for video tutorial.
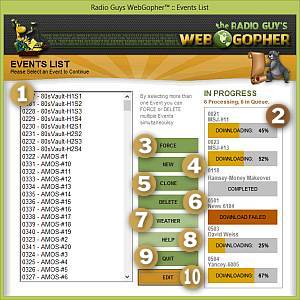
You can also clone an existing Event to edit, create a new Event to edit, select an edit an existing Event, or configure the special daily weathercast Event. The right side of the menu displays a handy list and progress bars for any Events in process. (1) Alphabetical list of all Events (2) In Progress shows number of queued and in process Events, with progress bars showing the live status of all Events currently being processed. (3) Force sends one or more selected Events to the queue for immediate processing (4) New creates a new Event ready for editing (5) Clone Clones an existing Event ready to be edited (6) Delete permanently removes one or more selected Events from the system (7) Weather configures the special daily weathercast Event parameters (8) Help opens a browser to this page (9) Quit exits the Events List menu (10) Edit opens the Event Editor menu for the selected Event. |
||||||||||||||||||||||||||||||||||||||||||||||||||||||||||||||||||||||||||||||||||||||||||||||||||||||||||||||||||||||||||||||||
 Light circles indicate clickable controls. Click for video tutorial.
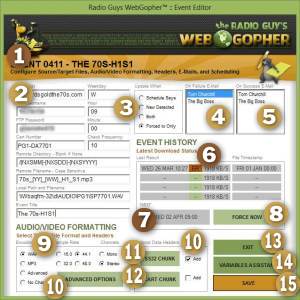
 WebGopher™ is unique in that you can set all options on a per event basis. So, for example, success or fail e-mail notifications can go not only to station personnel but to the voice talents that produced specific tracks as well. (1) Event Title displays Event name and ID (2) Source and Target retrieval information (3) Event scheduling (4) Failure email list (5) Success email list (6) Event History showing status of last four processing attempts (7) Next Event Time shows when this Event will next be processed, or a progress bar if the Event is being processed at this time (8) Force Event into queue for immediate processing. (9) Audio & Video Formatting selects target encoding, data rate, and channels (10) Advanced Options for additional audio and video output formats (11) Add or remove SS32 meta data from an audio file (12) Add or remove AES cart chunk meta data (13) Exit (14) Variables Assistant (15) Save any changes. |
||||||||||||||||||||||||||||||||||||||||||||||||||||||||||||||||||||||||||||||||||||||||||||||||||||||||||||||||||||||||||||||||
CHANGE LOG To activate new features no action is necessary. The software will automatically detect any new modules, download them and restart when complete.
The Several new variables have been made available for use. WebGopher now has a collection of variables to indicate dates up to seven days in the past for those times when you need to download a program on Thursday, that uese Monday's date in the file naming convetion for example. Also in working with some Rivendell systems it was discovered that having a unique title for the ingest was needed to insure that the automation did not think it had already seen the audio that was being updated by WebGopher. To help in those situations you can now use the [R] tag in your file names to insert a six digit random number. Details can be found on the User's Guide here, and here. The WebGopher standard user name password web authorization has been activated so password protected audio files can be downloaded automatically. Simply enter the event url starting with http:// or https:// and include the user name and password required in the fields below. In many cases syndicators that require a username and password to access a page on their sites do not actually password protect the audio file itself. Simply knowing the exact URL and entering that into a WebGopher Event is enough to be able to download the file. In these cases we recommend experimenting to see in a browser to find the audio, and check to see whether the username and password is actually required or not. NO EVENTS DISPLAY GLITCH In some cases a buffer overrun error occured when trying to show the main Live Status menu for new clients if the default Event was altered and no new Events had yet been entered. Without the main menu other functions could not be easily accessed. This was corrected so that even with no actual Events the display still loads properly. OPEN-DNS ROUTING ERRORS It was discovered that Open-DNS was not routing WebGopher's autoup;date module to our server, but to one of their pages instead. For the auto-updates this was corrected in the update module to bypass Open-DNS by using our server's IP instead of it's URL. WARNING: This will not fix problems with other download sites not loading due to interference or errors caused by using Open-DNS. It is highly recommended that clients do NOT use Open-DNS for their traffic routing or understand exactly how to configure Open-DNS when possible to avoid blocked connections. ANYTIME AUTOUPDATE The auto-update features had been set to activate only when WebGopher loaded during beta testing. That limitation has now been removed. The program will search for updates several times an hour and update itself automatically when new modules are found. If you have downloaded or installed the software prior to May 5, 2014 you may need to exit and restart to activate this feature. LICENSE The license entry and validation has changed to prevent users from accidentally exiting the initial splash menus until a valid license has been entered. This led to confusion when the entry was skipped, and the program started but could verify the invalid license and kept popping up error messages to that effect. In addition, if the license becomes invalid when the program is running under a previously valid license key (the user changes the key in the General Settings menu, the trial expires, multiple use is detected, etc.) the program exits back to the login splash menu, advises of the issue, and prompts the user to retry or enter a valid key. LEVELS By request WG now has a setting to adjust audio levels on the main Event Editor menu. This was planned to be added to the advanced options page but seems to be a popular enough setting that a second series of clicks to set it would be annoying. Set the level as a percent in the box indicated and any output file will have the gain increased or decreased by that percentage from the original. For Events that have not had this entered previously WG defaults to 100%. Please note that this is a gain adjustment, not a normalization. Normalization - to a given level (usually) below 0 dBFS entered in dB - is available, and likely will appear in the advanced menu unless users prefer a true normalization to a simple gain effect in which case there is space on the primary menu. Caution: Increasing the percentage on an MP3 output file can lead to issues with some players as they will truncate audio when encountering a sample value greater than 32768. MP3 to MP3 Conversions Due to an oversight this had not been activated. Now WG can take an MP3 input file, change the parameters and write back an MP3 output file, just as with WAV files. Other formats are to be available in the Advanced Options menu. To activate new features at this time you must exit and restart WebGopher. The software will automatically detect any new modules, download them and restart when complete. A coming update will check for new modules continually in the background not just on startup. |
||||||||||||||||||||||||||||||||||||||||||||||||||||||||||||||||||||||||||||||||||||||||||||||||||||||||||||||||||||||||||||||||